
Roof Siding Repair: A 25-Year Contractor's Complete Guide to Protecting Your Home
I have been repairing and replacing roofs for over twenty-five years. My team and I have completed more than three thousand roofing projects across Texas. We hold certifications from GAF, CertainTeed, and Owens Corning. We are also certified by the National Roofing Contractors Association. This experience gives me a unique perspective on roof siding repair. I want to share that knowledge with you today. This article exists to solve a real problem for homeowners. After a storm, you see damage to your roof and siding. You feel confused and overwhelmed. You do not know where to start. You worry about insurance claims and repair costs. This guide answers all those questions. It gives you clear, actionable steps based on real-world experience. The information here comes from thousands of customer projects. It is based on manufacturer specifications and building codes. We follow the International Residential Code (IRC) for all our work. We also use data from industry sources like the Insurance Institute for Business & Home Safety. Our recommendations come from proven methods that work in the field. This is not just theory. This is practical advice from someone who fixes roofs every day.
Your home's roof and siding work together as a system. They protect your family and your belongings from the weather. When one part fails, the whole system is at risk. A small siding issue can lead to major roof leaks. A damaged roof can ruin your siding. Understanding how to repair both is crucial. This guide will walk you through everything. We will cover how to spot damage. We will explain the repair process step by step. We will discuss materials and costs with real examples. You will learn how to work with insurance companies. Most importantly, you will gain the confidence to make smart decisions. Let's begin with understanding what roof siding actually is and why it matters so much.
Understanding Roof Siding: More Than Just an Exterior
Many homeowners use the term "siding" loosely. In roofing, we talk about specific components. Roof siding typically refers to the vertical cladding on the side of your house. But it also includes critical transition areas. These are the points where your roof meets your walls. Proper flashing and sealing at these junctions are vital. They prevent water from getting behind your walls. According to building science, this is where most leaks start. The National Roofing Contractors Association (NRCA) has detailed guidelines on these details. Water intrusion causes rot, mold, and structural damage. Repairing the visible shingle is only half the job. You must also address the siding and flashing beneath it.
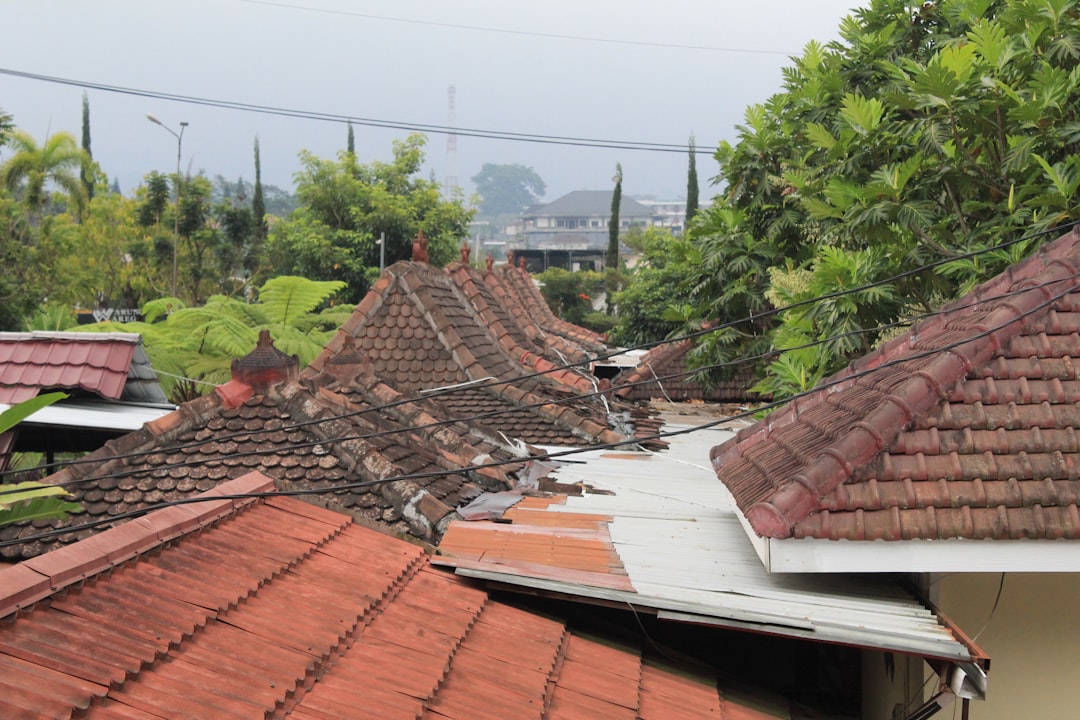
Common Roof-to-Wall Junctions and Their Vulnerabilities
Look at your house. Where does the roof slope meet a vertical wall? This is called a roof-to-wall intersection. It is a high-risk area. Standard practice uses step flashing and counter-flashing. Step flashing is layered under each shingle and over the siding. Counter-flashing is embedded into the wall's mortar or siding. Over time, these metal pieces can rust or become loose. In a storm, high winds can tear them away completely. Another critical area is the rake edge. This is the sloped edge of your roof at the gable end. The siding here is often cut to fit under the drip edge. If not sealed properly, wind-driven rain can be forced underneath.
Identifying Damage: A Contractor's Eye View
After a storm, do not just look at your shingles. You need a systematic inspection method. Start from the ground with binoculars. Look for missing or lifted siding panels. Pay special attention to areas near roof edges. Look for bent or missing metal flashing. Check for cracks in vinyl or fiber cement siding. Look for dents or holes in aluminum siding. Next, safely inspect from a ladder if you can. Never get on a wet or steep roof yourself. Look for granules from asphalt shingles collecting in your gutters. This is a sign of wear. Look for gaps where the siding meets the roof trim. Use your hand to feel for soft spots in the wood underneath. This indicates water damage. Document everything with photos. Take clear pictures from multiple angles. This evidence is crucial for insurance claims.
Storm Damage vs. Normal Wear and Tear
Insurance companies make a key distinction. They cover sudden, accidental damage from a storm. They do not cover deterioration from age or lack of maintenance. A hail dent in your aluminum siding is storm damage. Faded paint or minor cracking from sun exposure is wear and tear. Wind tearing off a section of siding is storm damage. A slow leak that rots the wood behind the siding is often considered maintenance. Knowing the difference helps set realistic expectations. The Insurance Information Institute provides good resources on this topic. Always report suspected storm damage to your insurer promptly. There are usually time limits for filing claims.
The Complete Repair Process: From Inspection to Completion
A proper repair is a multi-step process. Rushing any step leads to future problems. First, we conduct a thorough inspection. We measure the damaged area. We identify all affected materials. We check for hidden water intrusion inside the attic or walls. Second, we create a detailed scope of work. This lists every task and material needed. Third, we prepare the site. We protect your landscaping. We set up safety equipment. Fourth, we remove the damaged materials. We carefully take off shingles and siding to expose the sheathing. We inspect the wood decking for rot. Any rotten wood must be replaced. This is non-negotiable for a lasting repair.
Fifth, we install new underlayment if needed. This is a water-resistant barrier over the wood. Sixth, we install new flashing. We use corrosion-resistant metals like aluminum or galvanized steel. We follow the manufacturer's installation instructions precisely. Seventh, we re-install the siding. We ensure proper alignment and fastening. We use the correct nails or screws for the material. We leave appropriate expansion gaps. Eighth, we re-install the roofing shingles. We weave the new shingles with the existing ones for a seamless look. Ninth, we apply sealants and caulking at all joints. We use high-quality, UV-resistant products. Finally, we clean up the job site completely. We remove all debris and nails. We do a final walkthrough with the homeowner.
Material Choices: Pros, Cons, and Real-World Performance
Choosing the right siding material is a big decision. It affects cost, durability, and appearance. Let's compare the most common options from a contractor's viewpoint.
- Vinyl Siding: This is very popular. It is affordable and low-maintenance. It comes in many colors and styles. However, it can become brittle in extreme cold. It can melt if too close to a grill vent. It also expands and contracts with temperature changes. Proper installation with loose nails is critical. Brands like CertainTeed offer strong warranties.
- Fiber Cement Siding: Brands like James Hardie are excellent. This material is very durable. It resists fire, rot, and insects. It holds paint well. The downside is higher cost and weight. It requires special tools to cut, which creates silica dust. Installation must follow the manufacturer's specs exactly for the warranty to be valid.
- Engineered Wood Siding: This is a good middle-ground option. It looks like real wood but is more stable. It is made from wood strands and resins. It is less prone to warping than solid wood. It paints well. Always check for a moisture-resistant treatment.
- Metal Siding (Aluminum/Steel): This is very tough. It stands up well to hail and high winds. It does not rot or burn. Aluminum is lightweight but can dent. Steel is stronger but can rust if the coating is damaged. Proper grounding is important for lightning safety.
Your roofing material must also be compatible. Asphalt shingles work with most siding. Metal roofing requires specific flashings. Always consult the installation manuals from manufacturers like GAF or Owens Corning. Matching colors can be tricky. Sun exposure fades materials over time. Your new siding may not match the old perfectly. Sometimes, painting the entire wall is the best solution for a uniform look.
Cost Breakdown: Real Project Examples and What to Expect
Homeowners always ask about cost. The answer depends on many factors. These include the size of the damaged area, the materials chosen, your location, and labor rates. Let me share examples from recent projects to give you a realistic idea.
Example 1: Moderate Hail Damage Repair. A homeowner in Kingwood had hail damage on one roof slope and the siding on that side of the house. The repair involved replacing 12 squares of asphalt shingles (a square is 100 sq. ft.) and 400 square feet of vinyl siding. We also replaced all the step flashing on that side. The total cost was $8,500. This included materials, labor, dump fees, and permit. The homeowner's insurance deductible was $1,000. Their insurance covered the remaining $7,500.
Example 2: Wind Damage Repair. High winds tore off a section of fascia, soffit, and siding at a gable end. The repair required custom-cut aluminum fascia, new vinyl soffit panels, and 150 sq. ft. of fiber cement siding to match the existing. We also had to repair the roof decking underneath where water had seeped in. The total cost was $4,200. The insurance adjuster approved the claim in full after reviewing our detailed estimate and photos.
Example 3: Repair Due to Poor Flashing. This was not storm-related. An old roof-to-wall flashing failed over a dormer. It caused a slow leak that rotted the sheathing and the wood siding behind it. The repair involved opening the wall, replacing structural sheathing, installing new ice and water shield, new step flashing, and new cedar siding. The cost was $3,800. Since it was not sudden storm damage, the homeowner paid out-of-pocket. It was considered a maintenance issue.
Always get at least three written estimates from licensed contractors. The cheapest price is not always the best value. Look for detail in the estimate. It should list specific materials by brand and type. It should include a timeline and warranty information.
Working with Insurance: A Contractor's Insider Advice
Dealing with insurance after storm damage is stressful. As a contractor, I work with adjusters every week. Here is my advice to make the process smoother. First, contact your insurance company immediately to start a claim. Take photos and videos of all damage before you touch anything. Do not make temporary repairs unless necessary to prevent further damage. If you do, keep all receipts. Your insurance company will send an adjuster to inspect. It is highly beneficial for you to have your own contractor present during that inspection. A good contractor can point out damage the adjuster might miss. They speak the same technical language.
You will receive a claim settlement document. Review it carefully with your contractor. Insurance estimates often use generic pricing software. They may omit necessary items like full flashing sets or code-required upgrades. Your contractor can provide a detailed line-item estimate to supplement the insurance paperwork. This is called a "scope of loss" report. You have the right to hire the contractor of your choice. Your insurer cannot force you to use their "preferred" vendor. The payment is typically made to you, the homeowner. You are responsible for paying the contractor. Some policies have an "Actual Cash Value" (ACV) clause. This means they pay the depreciated value first. They pay the recoverable depreciation after the work is complete. Understand your policy's terms. Resources from the Texas Department of Insurance can be very helpful.
Practical Homeowner Tips from 3,000+ Projects
Here is wisdom gathered from decades on the job. These tips can save you time, money, and headaches.
- Pre-Storm Preparation: Keep trees trimmed back from your house. Clean your gutters regularly. Ensure your attic ventilation is adequate. Proper ventilation reduces ice dam risk in winter and prolongs shingle life.
- Post-Storm Action: Document everything with date-stamped photos. Make a list of all damaged items. Contact your insurance company within 24-48 hours. Get a professional inspection even if you think damage is minor.
- Choosing a Contractor: Verify they are licensed and insured in Texas. Ask for proof of liability and workers' compensation insurance. Check for manufacturer certifications. Read online reviews. Ask for local references. Get everything in writing.
- During the Repair: Discuss work hours and site protection with your contractor. Move vehicles and patio furniture out of the work zone. Cover items in your attic from dust. Be available for questions but let the crew work.
- Long-Term Maintenance: Inspect your roof and siding at least twice a year. Look for cracked caulk, loose nails, or rust spots. Clean your gutters in spring and fall. Address small problems immediately before they become big, expensive ones.
Frequently Asked Questions (FAQ)
1. Can I just repair the siding and not the roof, or vice versa?
It depends on the extent of the damage. Often, roof and siding damage occur together in the same storm event. If only one is damaged, you can repair just that component. However, you must check the underlying structure where they meet. If the flashing or sheathing is compromised, both systems may need attention. A professional inspection will determine this.
2. How long does a typical roof siding repair take?
For a standard repair on a single side of a house, the work usually takes 2 to 4 days. Day one is for setup, tear-off, and inspection. Day two is for installing new underlayment, flashing, and siding. Day three is for roofing and finishing details. Day four is for cleanup and final inspection. Weather can delay the schedule.
3. Will the new materials match my old ones exactly?
Probably not perfectly. Sun exposure fades all materials over time. Even from the same manufacturer, dye lots can vary between production runs. A good contractor will try to get the closest match possible. Sometimes, blending new materials with old on different walls can create an acceptable look. For a perfect match, you may need to paint the entire wall or side of the house.
4. Do I need a permit for this type of repair?
In most Texas municipalities, yes. Any repair that involves structural sheathing or a significant area typically requires a building permit. Your contractor should pull this permit. It ensures the work is inspected and meets local building codes. This protects you as the homeowner.
5. What warranty should I expect on the repair work?
You should receive two warranties. First, the manufacturer's warranty on the materials (shingles, siding, etc.). This often lasts 25 to 50 years but requires proper installation by a certified contractor. Second, the contractor's workmanship warranty. This covers installation errors. A reputable contractor will offer a warranty of at least 2-5 years on their labor. Get both warranties in writing.
6. What if I find more damage once the repair starts?
This is common. We call it "hidden damage." Once we remove the damaged siding or shingles, we might find rotten wood or mold. Your contractor should stop work and inform you immediately. They will document the new damage with photos. You then need to contact your insurance adjuster to get a supplemental claim approved for the additional work and cost.
7. How can I prevent this damage in the future?
Regular maintenance is key. Keep trees trimmed. Ensure gutters are clean and downspouts direct water away from your foundation. Have a professional roof and siding inspection every 3-5 years. After a major storm, do a visual check from the ground. Address small issues like missing caulk or a loose shingle right away.
Real Project Case Studies with Outcomes
Case Study: The Hail Storm of Spring 2023. A family in Atascocita had severe hail damage. The hail was golf-ball sized. It dented their aluminum siding and shattered the granule surface on their 10-year-old roof. They filed an insurance claim. The initial adjuster's estimate was low. It only covered painting the dented siding and a roof overlay. We met with the adjuster and the homeowner. We showed that the dents had cracked the paint, leading to potential rust. We also showed that a roof overlay over damaged shingles would void the manufacturer's warranty. We provided technical data from the IBHS on hail damage. The adjuster agreed to a full roof replacement and new siding on the most damaged elevations. The outcome was a fully restored, warrantied home. The homeowners were thrilled.
Case Study: The Hidden Leak. A homeowner noticed a water stain on an interior ceiling. They thought it was a simple roof leak. Upon inspection, we found the shingles were fine. The problem was a failed counter-flashing where a second-story wall met the roof. Water had been running behind the brick veneer and siding for months. It had rotted the structural sheathing. The repair required removing a section of brick, replacing sheathing, installing new ice and water shield, and new flashing. We then re-installed the brick. The repair cost $5,600. Because it was a gradual leak, insurance did not cover it. The lesson: investigate water stains immediately. The source is often not where the stain appears.
Industry Statistics and Data
Understanding the bigger picture helps. According to the National Oceanic and Atmospheric Administration (NOAA), the U.S. averages over 1,200 tornadoes and numerous severe hail storms each year. The NRCA reports that improper flashing is the leading cause of residential roof leaks, not shingle failure. A study by the Insurance Institute for Business & Home Safety found that roofs installed using their FORIFIED™ standards can withstand much higher winds. The North American Insulation Manufacturers Association (NAIMA) notes that proper attic insulation and ventilation can reduce ice dam formation by up to 90%. These statistics show that quality installation and proactive maintenance are critical investments.
Step-by-Step Guide: What a Professional Repair Looks Like
Here is a simplified, step-by-step overview of our standard repair protocol. This is based on the International Residential Code (IRC) Chapter 9 requirements.
- Safety First: Set up ladders, scaffolding, and fall protection. Use cones and signs to mark the work area.
- Inspection & Documentation: Photograph all pre-existing conditions and damage. Measure the work area.
- Material Removal: Carefully remove damaged shingles and siding. Preserve any undamaged materials for re-use if possible.
- Structural Assessment: Inspect the exposed wood sheathing and wall studs. Mark any areas of rot or damage for replacement.
- Prepare the Substrate: Replace any rotten wood. Secure any loose sheathing with new screws or nails. Apply a water-resistant barrier (like felt or synthetic underlayment) over the sheathing.
- Install Flashing: Install new, corrosion-resistant step flashing at all roof-to-wall junctions. Install new drip edge at roof eaves and rakes.
- Install Siding: Starting from the bottom, install the new siding according to the manufacturer's instructions. Leave proper expansion gaps. Use the correct fasteners.
- Install Roofing: Install new shingles, weaving them into the existing field. Install new ridge cap shingles.
- Seal & Finish: Apply high-quality sealant at all joints, penetrations, and trim pieces. Install any final trim pieces or vents.
- Cleanup & Final Inspection: Remove all debris, nails, and packaging. Perform a thorough final inspection with the homeowner. Review warranties and provide documentation.
Conclusion: Your Path to a Secure Home
Roof siding repair is a critical part of homeownership. It protects your largest investment. Ignoring damage leads to costly, extensive repairs down the road. The key is knowledge and proactive action. You now understand how roof and siding systems work together. You know how to identify damage and document it. You have insights into the repair process, materials, and costs. You are equipped to navigate an insurance claim. You have practical tips from decades of field experience. Your next step is to take action. If you suspect storm damage, schedule a professional inspection. Choose a qualified, licensed contractor who communicates clearly. Get detailed estimates. Do not let fear of the process paralyze you. A well-executed repair will restore your home's beauty, safety, and value. It will give you peace of mind for years to come. Your home deserves that protection.