
Residential Roof Repair Near Me: Your Complete Guide from a 20-Year Roofing Contractor
I have been repairing and replacing roofs across Texas for over two decades. In that time, my team and I have completed more than 3,500 residential projects. We hold certifications from major manufacturers like GAF and Owens Corning. This hands-on experience gives me a unique perspective on what homeowners truly need to know. This article exists because I have seen too many people confused and stressed about roof problems. They search for "residential roof repair near me" and get overwhelmed by conflicting information. My goal is to solve that problem. I want to give you clear, honest answers so you can make smart decisions for your home. The information here comes directly from my work on customer homes. It is based on real-world application of building codes, manufacturer specifications, and insurance guidelines. I will explain the methodology behind every recommendation. This is not generic advice. This is field-tested knowledge from repairing roofs in our local climate. You will get direct answers that save you time and money. Let's begin your journey to a secure, dry home.
Understanding Your Roof: A Contractor's Breakdown
Your roof is a complex system, not just shingles. Understanding its parts helps you communicate with contractors. The main components work together to protect your home. Knowing these terms prevents misunderstandings during repair estimates.
The Roofing System Layers
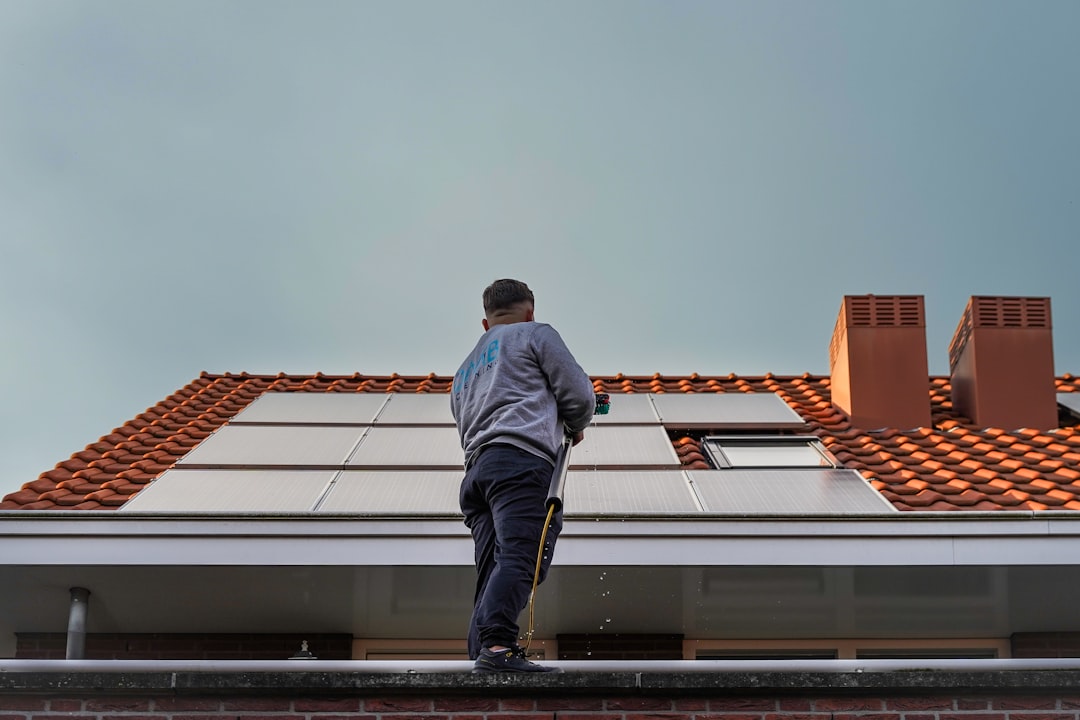
The decking is the wooden base nailed to your home's rafters. It is usually plywood or oriented strand board (OSB). The underlayment is a water-resistant barrier installed over the decking. It acts as a secondary shield if water gets past the shingles. Modern synthetic underlayments are far superior to traditional felt paper. The shingles are the visible, outermost layer designed to shed water. Flashing is metal installed at roof intersections and penetrations. It directs water away from vulnerable areas like chimneys and vents. Proper flashing installation is critical for preventing leaks.
Common Roof Problems We See Daily
Missing or damaged shingles are the most obvious issue. High winds can lift and tear shingles off your roof. Granule loss is another common problem. Asphalt shingles shed their protective granules as they age. You will see these granules in your gutters. This exposes the asphalt to UV rays, causing cracking. Leaks often occur at flashing points, not in the middle of the roof. Valleys, where two roof planes meet, are also high-risk areas. Poor attic ventilation causes heat and moisture buildup. This can warp decking and reduce shingle life significantly.
When You Need Repair vs. Full Replacement
This is the biggest question homeowners face. The decision depends on the roof's age, damage extent, and underlying condition. A good contractor will give you an honest assessment, not just sell the most expensive option. Let's break down the key factors.
Signs That Indicate Repair is Sufficient
Localized damage from a single storm event often warrants repair. This includes a small section of missing shingles after high winds. Isolated leaks around a specific penetration, like a plumbing vent, are usually repairable. Minor flashing issues can be corrected without a full roof tear-off. If your roof is less than 10-15 years old and in good overall condition, repair makes sense. The repair area should be small, typically less than 10% of the total roof surface. The surrounding shingles must still be flexible and secure.
Red Flags That Signal Replacement is Necessary
Widespread granule loss across the entire roof is a major red flag. Your gutters will be full of black, sand-like material. Multiple leaks in different areas of the home suggest systemic failure. Curling or cupping shingles across many roof planes indicate advanced age. If you can see daylight through the roof boards in your attic, replacement is urgent. Significant storm damage affecting over 25-30% of the roof often makes replacement more cost-effective. Most shingle manufacturers pro-rate their warranties. A roof near the end of its warranty may not be worth repairing.
Real Cost Breakdown: What to Expect for Roof Repairs
Roof repair costs vary widely based on damage type, materials, and roof pitch. I will share real project examples from our recent work. These numbers reflect the Texas market and are for illustrative purposes. Your actual quote may differ based on specific conditions.
Common Repair Types and Price Ranges
Simple shingle replacement for a small wind-damaged area typically costs $350 to $600. This includes labor, materials, and disposal of old shingles. Fixing a leak at a pipe vent or chimney flashing ranges from $200 to $450. Valley repair is more complex and usually costs $500 to $900. Replacing damaged roof decking (plywood) adds $75 to $150 per sheet, plus labor. Emergency tarping after storm damage costs $300 to $800, depending on roof size and accessibility. Gutter repair or realignment often costs $150 to $400. Always get a detailed, written estimate that breaks down all costs.
Factors That Influence Your Final Bill
Roof pitch (steepness) is a major cost driver. Steeper roofs require special safety equipment and slow down work. The type of shingle matters. Architectural shingles cost more to repair than basic 3-tab. The extent of water damage inside your home can add significant cost. If leaks have damaged drywall or insulation, that requires separate repair. The time of year affects pricing. High demand after a major storm can increase costs temporarily. Your location and local permit fees will also be factored into the estimate.
Choosing the Right Materials: A Hands-On Comparison
Selecting materials is not just about color. Different shingles offer varying levels of protection, longevity, and warranty. I have installed thousands of squares of each major type. Here is my practical comparison from the installer's perspective.
Asphalt Shingles: The Standard Choice
Three-tab shingles are the most basic and economical option. They have a flat appearance and a typical lifespan of 15-20 years. Architectural or dimensional shingles are thicker and have a random, shadowed look. They last 25-30 years and offer better wind resistance. Premium architectural shingles can mimic the look of wood or slate. They often come with enhanced warranties, sometimes 50 years. All asphalt shingles are rated for wind resistance (e.g., ASTM D3161 Class F). Higher ratings are better for our area. Check manufacturer specifications like those from GAF or Owens Corning.
Alternative Roofing Materials
Metal roofing is durable and energy-efficient. Standing seam metal roofs can last 40-70 years. They are excellent for shedding snow and rain. Initial cost is higher, but longevity is superior. Synthetic slate or composite shingles offer a high-end look without the weight. They are resistant to impact and mold. Clay or concrete tiles are beautiful and extremely durable. They are also very heavy and require reinforced roof framing. Wood shakes provide a natural aesthetic but require more maintenance. They are also less fire-resistant unless treated. Always verify material compatibility with your existing roof structure.
The Professional Repair Process: Step-by-Step
Knowing what to expect reduces anxiety. A professional repair follows a logical sequence to ensure quality and safety. Here is the exact process my crew uses on every job, based on best practices and building codes.
Step 1: Comprehensive Inspection and Assessment
We start with a thorough exterior inspection from the ground and ladder. We look for damaged, missing, or curling shingles. We examine flashing, gutters, and roof penetrations. Next, we perform an interior attic inspection. We check for signs of water intrusion, proper ventilation, and decking condition. We document all findings with photos and notes. This inspection forms the basis of our detailed scope of work. We reference the International Residential Code (IRC) for structural requirements.
Step 2: Preparation and Safety Setup
Safety is our top priority. We set up ground protection for your landscaping. We use roof jacks and harnesses on steep pitches. We carefully remove damaged shingles and underlayment. We inspect the exposed decking for rot or soft spots. Any compromised wood is marked for replacement. We ensure the work area is clean and organized before installing new materials. This prevents unnecessary damage to unaffected parts of your roof.
Step 3: Installation and Quality Check
We install new plywood decking if needed, nailed to code specifications. We roll out synthetic underlayment, overlapping seams properly. We install new shingles, aligning them carefully with the existing pattern. We integrate new flashing with the old, using sealant where required. We replace any damaged ridge vents or other ventilation components. After installation, we conduct a final quality inspection. We check nail placement, shingle alignment, and clean up all debris. We walk the property to ensure no nails or materials are left behind.
Navigating Insurance Claims for Roof Damage
Dealing with insurance can be confusing. I have helped hundreds of homeowners through this process. Most repairs for sudden, accidental damage are covered. Wear and tear from age is not covered. Understanding the difference is key.
Documenting Damage for Your Claim
Take clear, date-stamped photos immediately after a storm. Photograph damaged shingles, dented vents, and any interior water stains. Do not climb onto your roof if it is unsafe. Use a ladder or zoom lens for ground-level shots. Keep a record of the storm date and any weather reports. Contact your insurance company promptly to start the claim. They will send an adjuster to inspect the damage. Be present during the adjuster's inspection. Point out all areas of concern you documented. Provide your contractor's estimate for comparison. The Insurance Information Institute offers helpful guidance on property claims.
Working with the Insurance Adjuster
The adjuster's estimate is often based on regional pricing databases. Your contractor's estimate may differ due to specific material choices or labor rates. This is normal. You have the right to hire the contractor of your choice. The insurance company cannot force you to use their preferred vendor. If there is a discrepancy between estimates, your contractor can discuss it with the adjuster. They can provide supporting documentation like material invoices. The goal is to reach an agreed-upon scope and price for repairs.
Finding a Trustworthy "Roof Repair Near Me"
Your search for "residential roof repair near me" will yield many results. Not all contractors are equal. Use these field-tested criteria to separate the professionals from the storm chasers.
Essential Credentials to Verify
Licensing: Verify the contractor holds a valid state license. In Texas, check the Texas Department of Licensing and Regulation (TDLR) website. Insurance: Request certificates for both liability and workers' compensation insurance. This protects you if an accident occurs on your property. Local References: Ask for addresses of recent repair projects in your area. Drive by to see the quality of their work. Manufacturer Certifications: Certifications from companies like GAF or CertainTeed indicate training on specific products. Better Business Bureau Rating: Check for complaints and how they were resolved.
Red Flags to Avoid
Be wary of door-to-door solicitors after a storm. High-pressure sales tactics are a major warning sign. Avoid contractors who ask for full payment upfront. Reputable companies typically require a deposit, with balance due upon completion. Do not sign a contract with blank spaces. Never work with a contractor who suggests committing insurance fraud. This includes asking you to exaggerate the damage date. Always get everything in writing. Verbal promises are not enforceable.
Practical Homeowner Tips from Real Projects
Small actions can prevent big problems. Here is advice I give to every customer after we complete a repair.
- Clean your gutters twice a year, in spring and fall. Clogged gutters cause water to back up under shingles.
- Trim tree branches that hang over your roof. Falling limbs can cause damage, and leaves promote moss growth.
- After heavy storms, do a visual inspection from the ground with binoculars. Look for missing shingles or damaged flashing.
- Check your attic periodically for signs of leaks, especially after rain. Look for dark stains on wood or wet insulation.
- Ensure your attic has adequate ventilation. Soffit vents and ridge vents should be clear of insulation blockages.
- Do not power wash your roof. High-pressure water can force moisture under shingles and remove protective granules.
- If you need to walk on your roof for any reason, wear soft-soled shoes to avoid damaging shingles.
Frequently Asked Questions (FAQ)
How long does a typical roof repair take?
Most minor to medium repairs are completed in one day. This includes shingle replacement or flashing repair. Complex repairs involving decking replacement or multiple leak points may take two to three days. Weather is always a factor. Work cannot be done during rain or high winds. Your contractor should provide a clear timeline during the estimate.
Will my roof repair be noticeable?
A professional repair should blend seamlessly with your existing roof. We carry shingles from many manufacturers and work to match color and style. On older roofs, an exact match may be impossible due to sun fading. In such cases, we often repair a larger section or use shingles from a different lot to create a uniform look. The goal is a repair that protects your home and maintains its curb appeal.
Do I need a permit for roof repair?
Permit requirements vary by city and county. Most jurisdictions require a permit for repairs exceeding a certain cost or involving structural changes. Replacing more than a certain percentage of the roof often triggers a permit. A reputable contractor will know local codes and pull all necessary permits. This protects you and ensures the work meets building standards. The permit fee is typically included in your project estimate.
What warranty comes with a roof repair?
You should receive two warranties. The first is the manufacturer's warranty on the new materials installed. This covers defects in the shingles or flashing. The second is the contractor's workmanship warranty. This covers errors in installation, like improper nailing. A standard workmanship warranty is one to five years. Always get warranty details in writing before work begins. Keep all documentation in a safe place with your home records.
Can I repair my roof myself?
I strongly advise against DIY roof repair for most homeowners. Working on a roof is dangerous without proper training and safety equipment. Improper repair can void existing manufacturer warranties on your roof. It can also lead to more extensive, hidden damage. What looks like a simple shingle replacement often reveals underlying decking rot. Hiring a professional ensures the job is done correctly, safely, and with proper warranties in place.
How do I know if a leak is serious?
Any leak is serious and should be addressed promptly. Water causes progressive damage to wood, insulation, and drywall. It can also lead to mold growth. Signs of a serious leak include large ceiling stains, dripping water, or sagging drywall. If you see water actively entering your home, place a bucket to catch it and call a roofer immediately. Temporary interior fixes do not solve the exterior problem. The source of the leak on the roof must be found and sealed.
What is the best time of year for roof repair?
Spring and fall typically offer the most stable weather for roofing work. Temperatures are moderate, which is ideal for shingle adhesion. Summer heat can make shingles too pliable and asphalt sealant too soft. Winter cold can make shingles brittle and prevent proper sealing. However, emergency repairs should never be delayed due to the season. A good contractor can work safely in a variety of conditions using appropriate techniques.
Real Project Case Studies
Case Study 1: Wind Damage Repair in Kingwood
A homeowner called after a spring storm with 60 mph winds. Several architectural shingles were missing from a rear roof plane. Our inspection found no decking damage. We replaced the damaged shingles and sealed the surrounding area. We matched the existing shingle color from our inventory. The repair was completed in four hours. Total cost was $425. The homeowner filed an insurance claim and their deductible was $1,000. Since the repair cost was less, they paid out-of-pocket to avoid a claim on their record.
Case Study 2: Chronic Leak at Chimney Flashing
A family had a persistent leak in their living room ceiling near the fireplace. Multiple handymen had attempted fixes with sealant, but the leak returned each winter. We discovered the original step flashing was improperly installed and corroded. We removed the surrounding shingles, installed new galvanized step flashing, and integrated it with new counter flashing on the chimney. We also replaced two rotted decking sheets in the area. The project took one full day and cost $1,150. The leak has not returned in three years.
Industry Statistics and Data
Understanding broader trends helps contextualize your decision. According to the National Roofing Contractors Association (NRCA), proper maintenance can double a roof's service life. The average cost of a minor roof repair in the U.S. is $950. Over 90% of roofs in North America are asphalt shingle. Insurance industry data shows wind and hail are the top causes of roof damage claims. A well-maintained roof can improve a home's energy efficiency by up to 15%. These figures highlight the value of proactive care and professional repair.
Conclusion: Your Path to a Secure Home
Your roof is your home's first line of defense. Addressing problems quickly prevents costly interior damage. I hope this guide has demystified the process of residential roof repair. You now understand the system, the costs, and how to find a qualified professional. Start with a thorough inspection, either your own or a professional's. Get multiple detailed estimates for any significant repair. Ask questions and verify credentials. Do not let a small issue become a major emergency. Your home is your most valuable investment. Protecting it starts from the top. If you have specific questions about your roof, consult with a local, established contractor. They can provide advice tailored to your home's unique situation. Thank you for trusting my experience. I wish you a dry and secure home for many years to come.