
House Flashing Repair: Your Complete Guide from a 15-Year Roofing Contractor
I have been repairing roofs for over fifteen years. My team has completed more than two thousand roofing projects. We hold certifications from major manufacturers like GAF and Owens Corning. This experience taught me one important truth. Most roof leaks start at the flashing. This small metal piece protects your home's most vulnerable spots. This article exists to solve a real problem for homeowners. You hear a drip in your attic after a storm. You see water stains on your ceiling. You wonder where it's coming from and how much it will cost to fix. This guide answers those exact questions. It gives you the knowledge to protect your biggest investment. The information here comes from real customer projects I have completed. It references manufacturer installation instructions and local building codes. My recommendations are based on what actually works on the roof, not just theory. This guide will save you time, money, and stress by explaining flashing repair clearly.
What is Roof Flashing and Why Does It Fail?
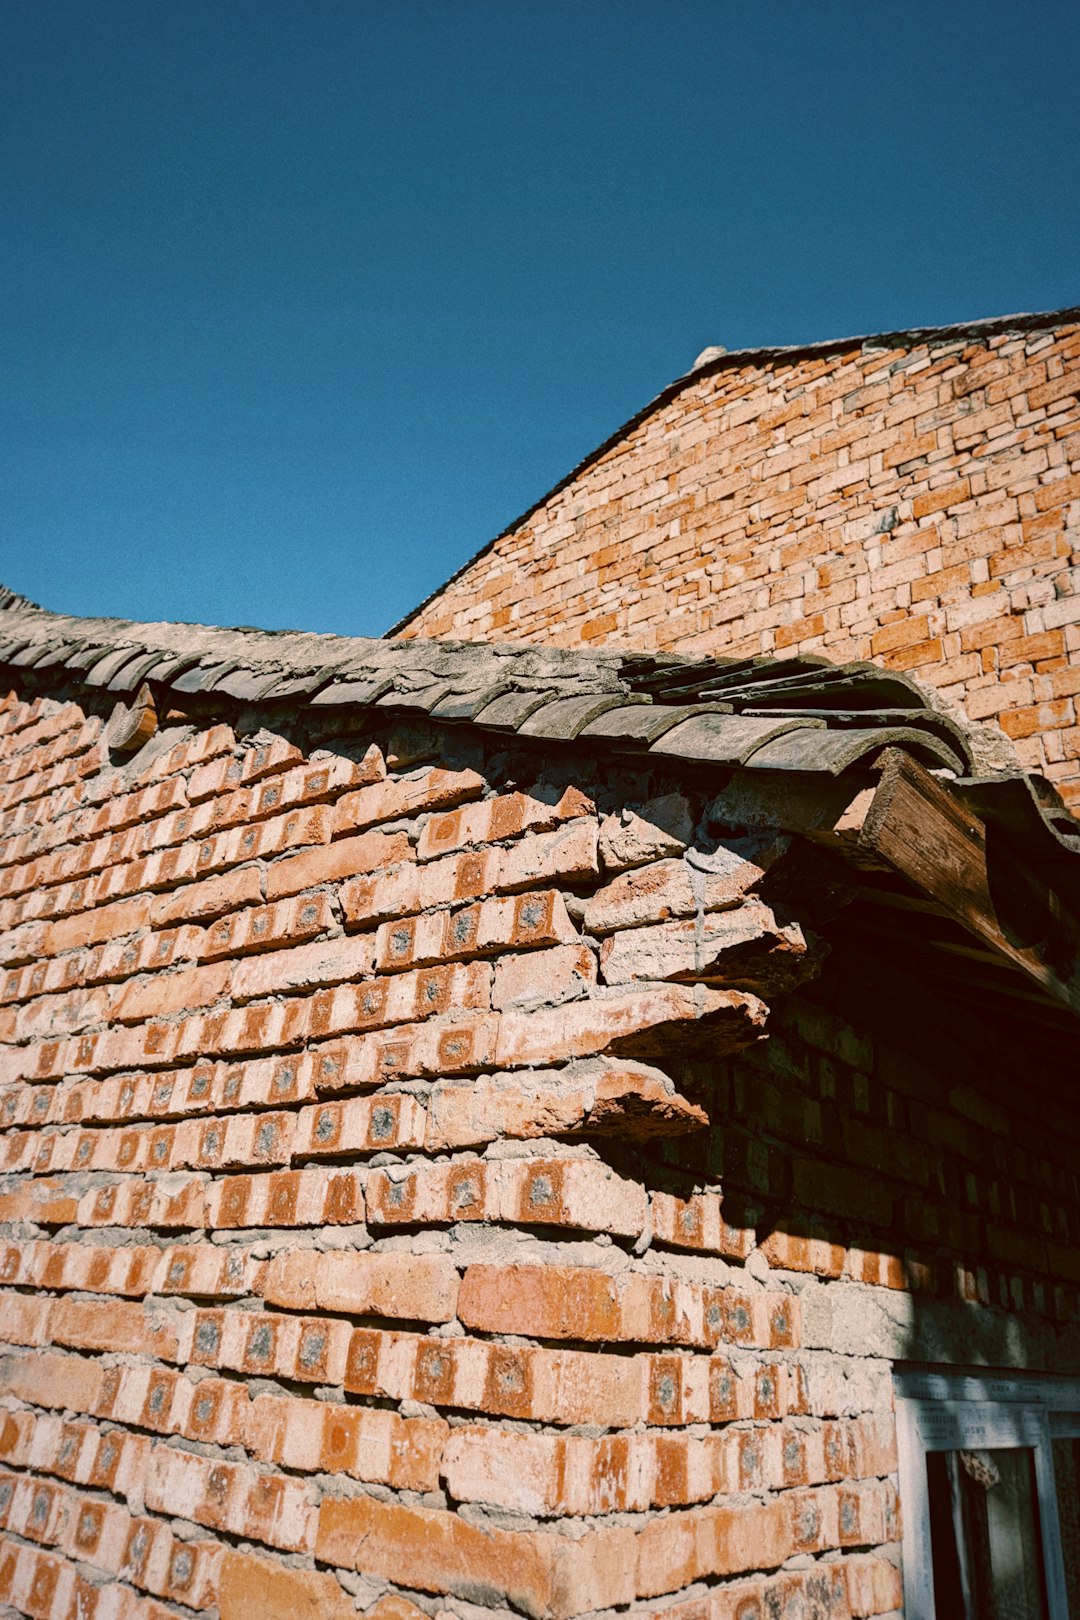
Roof flashing is a thin material, usually metal. It directs water away from critical intersections on your roof. These are places where the roof meets a wall, chimney, or skylight. Flashing creates a watertight seal at these joints. Think of it as your roof's raincoat. It keeps water from sneaking into your home. Flashing is installed in valleys, around vents, and along roof edges. The National Association of Home Builders (NAHB) considers proper flashing essential for a durable roof. Most flashing fails due to age and weather exposure. The sun's ultraviolet rays break down the material over time. Expansion and contraction from temperature changes cause metal to warp. Poor installation is another common cause. If flashing is not sealed correctly, water will find a way in. Storm damage from wind or hail can also bend or tear flashing away from the roof.
Common Types of Roof Flashing
Different roof areas require different flashing types. Step flashing is used where a roof meets a sidewall. It looks like small, L-shaped metal pieces layered under each shingle. Valley flashing protects the V-shaped area where two roof slopes meet. This is a high-water flow area. Chimney flashing is more complex. It uses a combination of step flashing and a saddle or cricket to divert water. Vent pipe flashing is a rubber or metal collar that seals around plumbing vents. Drip edge is a metal strip along the roof's edge. It directs water into the gutters. Each type has a specific job. Using the wrong type is a common installation mistake.
How to Spot Flashing Failure
Homeowners can spot flashing problems before major leaks occur. Look for rust stains on metal flashing. This is a clear sign of corrosion. Check for gaps between the flashing and the roof surface. Look for cracked or missing sealant, called roofing cement or caulk. Inspect for bent, loose, or missing flashing pieces. Inside your home, watch for water stains on walls or ceilings near chimneys or dormers. Peeling paint on exterior walls can signal water behind the siding. Musty smells in the attic are another warning sign. Regular visual inspections twice a year can catch these issues early.
The Real Cost of House Flashing Repair
Flashing repair costs vary widely based on the problem. A simple resealing job with new caulk might cost $200 to $500. Replacing a section of valley flashing could range from $300 to $800. Full chimney flashing replacement is more involved. It often costs between $1,000 and $2,500. The total price depends on the roof's pitch, height, and material. Steeper roofs are harder and more dangerous to work on. This increases labor costs. The type of metal used also affects the price. Aluminum is common and affordable. Copper is more expensive but lasts much longer. I recently repaired a customer's step flashing in Kingwood. Their roof met a brick wall. The old galvanized steel flashing had rusted through. We replaced a 20-foot section with new aluminum flashing. The total cost was $650. This included labor, materials, and a full inspection of the surrounding shingles.
Factors That Influence Repair Price
- Extent of Damage: A single loose piece costs less than widespread corrosion.
- Roof Accessibility: Easy-to-reach single-story roofs are cheaper to repair.
- Flashing Material: Copper costs more than aluminum or galvanized steel.
- Local Labor Rates: Prices differ by region and contractor expertise.
- Additional Repairs: Often, rotten wood sheathing is found under bad flashing.
Insurance and Flashing Repair
Homeowners insurance may cover flashing repair under certain conditions. Sudden, accidental damage is usually covered. This includes damage from a fallen tree limb or major hail storm. Gradual wear and tear or lack of maintenance is typically not covered. Always document the damage with photos before making repairs. Contact your insurance company to file a claim. They will send an adjuster to assess the damage. Provide them with your contractor's repair estimate. The Insurance Information Institute (III) offers resources on understanding property claims. Be prepared for your deductible to apply. Sometimes, repair costs are less than the deductible amount.
Choosing the Right Flashing Materials
Selecting the correct material is crucial for a lasting repair. Aluminum is lightweight, rust-resistant, and cost-effective. It is a great choice for most residential applications. Galvanized steel is strong and inexpensive but can rust over time. Copper is the premium option. It develops a protective patina and can last over 50 years. However, copper is expensive and requires skilled installation. Lead-coated copper is sometimes used for custom shapes. Vinyl or PVC flashing is used for certain windows and doors. For roof repairs, I most often recommend aluminum. It offers the best balance of durability and cost. Always match the new flashing to the existing type if possible. Mixing metals can cause galvanic corrosion. This is when two different metals react and accelerate rust.
Material Comparison from the Field
Let's compare materials based on real-world performance. Aluminum flashing costs about $2 to $4 per linear foot for materials. It handles our Texas heat well without significant expansion. Galvanized steel costs $1.50 to $3 per foot but will show rust in 10-15 years. Copper costs $15 to $25 per foot just for the material. Its installation is an art. I used copper on a historical home restoration in Houston. The goal was a 50-year solution. For 90% of homes, 0.019" thick aluminum is perfectly suitable. Check the manufacturer's specifications. GAF Master Elite training emphasizes proper material selection. The right choice prevents callbacks and protects your reputation.
Sealants and Fasteners
The flashing is only as good as its seal. Roofing cement is a thick, asphalt-based sealant. It is good for filling gaps but can become brittle. High-quality polyurethane sealant, like NP1, remains flexible. It is better for sealing flashing edges. Never use cheap silicone caulk from a hardware store. It does not adhere well to roofing surfaces. Fasteners are equally important. Use roofing nails with a wide, galvanized head. Screws with rubber washers can be used for certain metal flashings. All fasteners should be driven into solid roof decking, not just the shingles. Then, they must be properly sealed over. A single unsealed nail hole is a potential leak source.
The Professional Flashing Repair Process
A proper repair follows a systematic process. First, we perform a thorough safety setup. This includes harnesses, roof jacks, and ladder stabilizers. We then carefully remove the shingles around the damaged flashing. We use a flat bar to lift shingles without breaking them. The old flashing is detached and removed. We inspect the underlying wood sheathing for rot. Any soft wood must be cut out and replaced with new plywood. This step is critical. Installing new flashing over rotten wood is pointless. The new flashing is cut and bent to fit the exact spot. We dry-fit it first to ensure a snug fit. Then, we apply sealant to the deck and set the flashing in place. We secure it with nails and seal every nail head. Finally, we reinstall the shingles over the flashing's top edge. The entire area is cleaned and inspected for water tightness.
Step-by-Step: Repairing Step Flashing
- Safety First: Set up fall protection and secure ladders.
- Remove Shingles: Carefully lift and remove shingles covering the old flashing.
- Extract Old Flashing: Pull nails and remove the corroded L-shaped pieces.
- Inspect Sheathing: Check for water damage and replace any rotten wood.
- Cut New Flashing: Cut aluminum pieces to match the old ones.
- Install and Seal: Slide each piece under the siding and over the deck. Nail and seal.
- Re-shingle: Layer shingles back over each new flashing piece.
- Final Inspection: Run a hose test to check for leaks.
Why DIY Flashing Repair Often Fails
Many homeowners attempt flashing repair themselves. They see a gap and fill it with caulk. This is a temporary fix at best. The real problem is often hidden. Water may have rotted the wood underneath. Simply sealing the surface traps moisture inside. This leads to more severe structural damage. DIYers also often use the wrong materials. They might nail through flashing without sealing the nail heads. They may not properly interweave flashing with shingles. Roof work is dangerous. A fall can cause serious injury. The Occupational Safety and Health Administration (OSHA) reports numerous roofing accidents each year. Hiring a professional ensures the repair is done safely and correctly the first time.
Practical Tips for Homeowners from Real Projects
Here is advice gathered from thousands of service calls. Schedule a roof inspection every two years. Do this in the spring or fall when the weather is mild. Keep your gutters clean. Clogged gutters cause water to back up under the roof edge and flashing. Trim tree branches that hang over your roof. Falling branches can damage flashing. Leaves on the roof hold moisture and accelerate rust. After a major storm, do a visual ground-level inspection. Look for missing shingles or bent metal. If you install a new satellite dish or solar panel, ensure the installer properly flashes the mounting points. Never let a handyman screw anything into your roof without a proper seal. When buying a home, make the roof and flashing a priority in the inspection. A small flashing issue found early can save thousands later.
Working with a Roofing Contractor
Choose a licensed and insured contractor. Ask for local references and check online reviews. Look for certifications from manufacturers. These require proper training. Get a detailed, written estimate. It should list all materials, labor, and cleanup. Avoid contractors who ask for full payment upfront. A reputable company will only request a deposit. Ensure they pull a permit if required by your local building department. This ensures the work meets International Residential Code (IRC) standards. Be present for the final walkthrough. Ask the contractor to explain what was done. A good roofer will be proud to show you their quality work.
Frequently Asked Questions About Flashing Repair
How long does roof flashing last?
Flashing lifespan depends on the material. Aluminum flashing typically lasts 20 to 30 years. Copper flashing can last 50 years or more. Galvanized steel may only last 10 to 15 years before rusting. The local climate and installation quality are major factors. Properly installed and maintained flashing should last as long as your roof shingles.
Can I paint my roof flashing?
Yes, you can paint aluminum or steel flashing for aesthetics. Use a high-quality acrylic latex paint designed for metal. Do not paint copper, as its natural patina is protective. Ensure the flashing is clean, dry, and rust-free before painting. Painting does not extend the life of failing flashing. It is only for color matching.
Is a leaking skylight always a flashing problem?
Not always, but it is the most common cause. Skylights have complex flashing kits. The leak could also be from a cracked skylight lens or failed sealant on the glass. However, in my experience, about 80% of skylight leaks originate from the perimeter flashing. A professional can perform a water test to find the exact entry point.
How often should flashing sealant be replaced?
Sealant is not a permanent solution. High-quality polyurethane sealant may last 5 to 10 years. Roofing cement often cracks in 3 to 5 years. Inspect sealant lines during your biannual roof check. Look for cracking, peeling, or gaps. Re-sealing is a maintenance task that can prevent bigger issues.
Will new flashing match my old roof?
New metal will look shiny and different from weathered old metal. This is normal. Aluminum and copper will weather to a dull gray or green patina over one to two years. You can request a pre-weathered material from some suppliers. The most important thing is that it functions properly, not that it matches perfectly on day one.
What is counter-flashing?
Counter-flashing is a second layer of flashing. It is often embedded into a masonry wall or siding. Its job is to cover the top edge of the base flashing. This creates a two-piece system that allows for movement. Chimneys almost always use counter-flashing. It is a sign of a high-quality installation when present.
Can I install new flashing over old flashing?
This is not recommended. It is called "layering" and is a shortcut. You cannot properly seal or secure the new layer. You also won't know the condition of the wood deck underneath. Always remove the old flashing completely. This allows for a proper inspection and a clean, lasting installation.
Real Project Case Studies and Outcomes
Case Study 1: The Hidden Chimney Leak
A homeowner in The Woodlands reported water in their fireplace. They had sealed the chimney crown twice with no fix. We inspected and found the step flashing was installed incorrectly. The original roofer had nailed through the vertical leg, breaking the seal. Water ran down the nail into the house. We removed two courses of brick to access the flashing. We replaced all the step flashing with new copper. We installed a proper cricket (a small peaked diversion) above the chimney. The total repair cost was $2,100. The leak was completely resolved. The lesson: Symptoms can be far from the actual problem. A professional diagnosis is key.
Case Study 2: The Insurance Claim Success
After a hailstorm in Kingwood, a client had dents on their roof and bent valley flashing. We documented the damage with photos and video. We helped the homeowner file an insurance claim. The adjuster initially denied the flashing repair, calling it wear and tear. We provided the manufacturer's specification showing the hail dents compromised the metal. We cited the Roofing Contractors Association of British Columbia (RCABC) guidelines on storm damage. The insurance company reversed its decision. They covered a full roof replacement and all new flashing. The outcome was a fully covered $18,000 roof. The lesson: Knowledge of insurance processes and proper documentation is powerful.
Industry Statistics and Data
The National Roofing Contractors Association (NRCA) reports that moisture intrusion causes most building envelope problems. A study by the National Association of Home Builders (NAHB) found that improper flashing is a top-10 construction defect. According to insurance industry data, water damage claims average over $10,000 per incident. Many of these start with a small flashing leak. Regular maintenance can reduce the risk of major damage by up to 80%. Investing in quality flashing materials and installation has a high return. It protects the entire structure of your home.
Conclusion: Protecting Your Home Starts at the Top
Your roof flashing is a silent guardian. It works every time it rains. Ignoring small problems leads to big, expensive repairs. This guide gave you a contractor's view of flashing repair. You learned what flashing is and why it fails. You understand the real costs and materials. You saw the professional repair process. You have practical tips and answers to common questions. The next step is action. If you suspect a problem, get a professional inspection. Choose a qualified, local contractor. Ask questions and understand the proposed solution. Your home is your sanctuary. Protecting it starts with a watertight roof. Proper flashing repair is not an expense. It is an investment in your home's longevity, safety, and value.